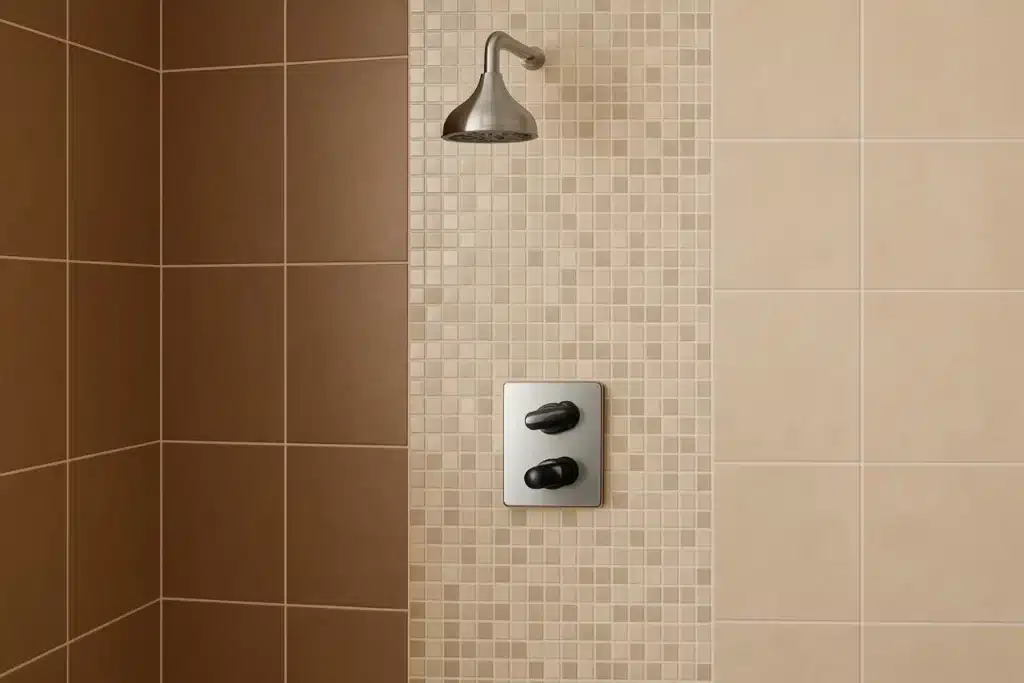
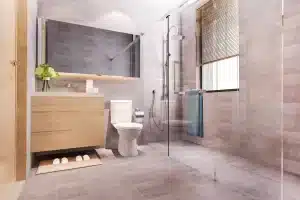
Showers and Wet rooms
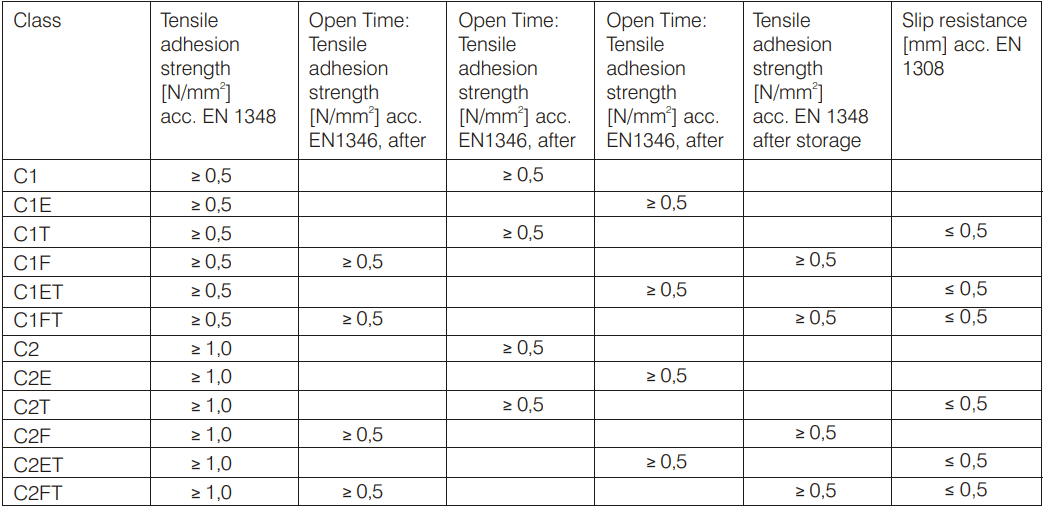
In wet situations particularly in bathrooms around the shower it is essential to tile onto an already water-resistant background such as tile backer board, using a Category C2 tile adhesive. Porous backgrounds such as plaster or plasterboard can be made waterproof by using a tanking (waterproofing) system. The ‘Multiguard’ range of products is available for different applications.
Large Format Tiles
With the current popularity of large format tiles it is important to make sure the background is flat, plumb and true before tiling begins. It is also worth bearing in mind that the tolerances for the tile are based on a proportion of the size of the tile. When fixing large format tiles it is essential to use the correct adhesive (Class 2 plus F, T, E, S1 or S2 where applicable). Consult your Multichem retailer and ensure as near as possible 100% coverage of tile adhesive, buttering the back of each tile as you fix the tiles. Large format tiles may not be suitable for fixing in a brick bond pattern.
Thin Tiles
Advances in technology in the tile industry has allowed for the introduction of thin tiles, which can vary from 3mm to 5.5mm in thickness. Whilst technical standards are being introduced on the product and fixing, it is important that you seek advice from the tile retailer and the tile adhesive manufacturer before fixing thin tiles.
Fixing Wall Tiles: Preparation
You will need a perfectly flat surface for tiling. Do not cut corners—preparing the surface is vitally important.
- Tile backer board is an inert board suitable for fixing tiles in most domestic situations. Make sure you follow the manufacturer’s installation instructions so that it is adequately supported.
- New plaster should be left for 4 weeks, thoroughly dried, and brushed down before tiling. Old plaster is suitable provided it is sound. Check with us whether or not the plaster requires priming before tiling can begin. The weight of tiling should not exceed 20 kg/m². Tiling over gypsum plaster requires different guidelines.
- Plasterboard is suitable for walls provided it is well supported, with the board being a minimum thickness of 5 mm. Fix the tiles directly onto the paper facing—do not skim with finish plaster. The weight of tiling should not exceed 32 kg/m².
- Painted surfaces must be carefully examined. The long-term success of the installation depends on good adhesion between the paint and the surface, as well as between the substrate and the structure. Remove any old wall coverings and flaking paint. Fill cracks and voids with a suitable filler (e.g., Multiflex AC, Powerseal XL, or CrackFix). Ensure the surface to be tiled is smooth, clean, and free from dust, dirt, or grease.
Fixing Wall Tiles: Setting Out
Planning ahead is essential for a good result. Take a long length of timber and mark the tile widths to help identify where each tile will start and finish—remembering to leave space for joints, which must be at least 2 mm wide. Set out the horizontal position of the tiles so that the same size cuts are made either side of windows etc. Avoid small difficult cuts as they can spoil the appearance. Plan each wall carefully, remembering that any patterns/designs will need to be matched in the corners of the room. For plain tiles each wall should be centralised avoiding any small cuts.
- Find the lowest point of the base you are working to (skirting, bath top, work surface etc.) with a spirit level.
- Place a tile against the lowest point and draw a line on the wall along the top of the tile. N.B. The start point of the line will depend on the setting out of the tiles, as the tile against the floor may be a cut tile.
- Nail the batten along the wall to this line. Use the spirit level to ensure it is level. The first line of tiles will rest on this batten.
- Draw a vertical (plumb) line at the center of the wall. Use this to check that the tiles are in line vertically.
- Spread the wall tile adhesive using a tile adhesive trowel onto the wall. Work in small areas a metre at a time, so that tiles are fixed before the surface of the adhesive forms a skin. Press and twist the wall tiles into the adhesive starting at the bottom and working upwards, one row of whole tiles at a time, using spacers (if required) to ensure a uniform joint. Check the horizontal and vertical lines with the spirit level every few rows.
- Remove surplus adhesive from joints to allow room for grouting and complete the tiling.
- When tiles need to be cut, your Multichem retailer member can explain the various cutters available.
- In awkward locations it is often easier to apply the adhesive onto the back of the tile instead of the wall. For complicated shapes make a template and transfer the design to the tile.
- If the tile does not have a glazed edge, a neat finish on external edges and corners can be achieved with the use of tile fixing trim incorporated at the time of tiling. To prevent the seepage of water around baths, basins and plumbing equipment such as shower taps a plastic sealing strip or silicone sealant, Multiflex S should be used.
Grouting
Do not begin grouting for at least 24 hours after fixing unless using rapid setting and hardening adhesives. There are many types of grout, e.g. Multifix Wall GT, so ask your Multichem member for the correct grout for your application, especially when using highly glazed tiles. Multichem manufactures grouts in 30 general colors along with custom colors. Force the grout into the joints using a grouting sponge. Do not use rigid spreaders as these can cause scratching to certain tile glazes. Remove surplus grout from the surface with a sponge. Polish with a dry cloth.
Fixing Floor Tiles Preparation
Time spent on proper preparation makes the fixing easier, quicker and ensures a better finish.
Setting Out
Planning ahead is essential for a successful project. Laying floor tiles will raise the level of the finished floor, so if possible remove all fixtures before tiling. Check the overall flatness of the floor. A levelling compound can be used to improve flatness levels. Mark a chalk line on the floor down the center of the room parallel to the most suitable wall (normally this is achieved by viewing the room from the doorway).
Lay the tiles down this line and then work towards the wall you think is best, leaving a joint between the tiles of at least 3mm. Tile spacers can be used to achieve a uniform size joint; however, they should be removed before grouting. Avoid small cuts, as they can be difficult to cut and do not look professional.
Cutting Tiles
Floor tiles are generally harder to cut than wall tiles. Modern tools make the cutting of most types of ceramic tiles simple. Ask your Multichem member about the various aids available.
Adhesives
Use normal or rapid setting adhesives conforming to local standards.
Always consult your Multichem member for detailed advice and follow manufacturers’ instructions. Mix the adhesive as per manufacturers’ instructions and spread with the recommended notched trowel to give a ribbed adhesive bed on the surface to be tiled. Butter the back of each tile with a thin layer of adhesive immediately before bedding it firmly into the fresh ribbed adhesive bed with a slight twisting motion to ensure a solid bed and prevent voids under the tile. Some “solid bedding” trowels and pourable adhesives are available that allow the floor tile to be solidly bedded without the need to butter the back of the tiles. Remove surplus adhesive from the tile surface and joints with a damp sponge or cloth. Work in small areas of about 1 sq. meter at a time so that tiles are fixed whilst the surface of the ribbed bed is still wet and workable. Every so often use a spirit level or straight edge to check that the tiles fixed are flat. Remove and adjust the amount of adhesive to achieve a flat surface, but don’t leave it too late or the adhesive will set. Leave adhesive to set before grouting (usually 24 hours unless using a rapid setting adhesive). In bathrooms, special attention should be paid to sealing the gap between wall and floor base using a flexible antibacterial sealant. A category C2 adhesive should be used when fixing fully vitrified tiles such as porcelain.
Grouting
Do not begin grouting or walk on the floor tiles for at least 24 hours (unless using a rapid set adhesive) to avoid disturbing the tiles before they have bonded completely with the adhesive. There are many types of grout so ask your Multichem member for the correct grout for your application. Multichem manufactures cement and epoxy-based grout such as Multifix Floor GT. Force the grout into the joints using a squeegee. Remove surplus grout from the surface with a sponge and, if required, peg the joints with a rounded stick to achieve an even better finish.
Note: When grouting tiles on a timber floor, use a water-based polymer admixture to improve flexibility.
Movement Joints
Movement joints allow for movement and help to prevent tile damage. The recommended minimum width is 6 mm, but it depends on each individual application. Movement joints are either field-applied sealant, or a prefabricated profile with anchoring legs which are adhered beneath the tile. Movement joints are normally installed where flooring abuts wall, steps, columns etc., on large floor areas and over structural movement joints. Floors less than 2 metres between walls will not normally require movement joints except where there is under-tile heating.
Maintenance
With proper care and attention, a correctly installed, good quality floor tile should give many years of trouble-free service. Grit is the biggest enemy of any floor material and a mat adjacent to external doors is strongly recommended. Terracotta and natural stone tiles may need sealing. Ask your Multichem member for details, as there are numerous cleaning and maintenance products on the market.
Tiling onto Concrete
New concrete must be at least six weeks old and thoroughly dry before fixing floor tiles. The surface must be smooth, flat and free from dirt and grease. Uneven surfaces can be improved with levelling compound.
Tiling onto Wooden Floors
New concrete must be at least six weeks old and thoroughly dry before fixing floor tiles. The surface must be smooth, flat and free from dirt and grease. Uneven surfaces can be improved with leveling compound.
- Overlay the existing timber with 15 mm dry exterior grade plywood, which has been sealed on the edges and back. Fully screw down the plywood at 300 mm intervals ensuring all junctions are supported by noggings or joists. Use a category C2 adhesive.
- Overlay the existing timber with a proprietary uncoupling membrane and use a category C2 adhesive.
- Overlay the existing rigid timber with a proprietary tile backer board and install following the manufacturers’ instructions. Use a category C2 tile adhesive. A CG2 grout is recommended with all of these methods. There are many factors to consider when deciding which method is best suited for your particular circumstances. It is important to seek professional advice.
For more information on specific products available for fixing to timber floors consult a Multichem member tile retailer.
Tiling onto Hard Vinyl Tiles
Existing hard tiles must be free of grease, polish etc. and firmly adhered to the subfloor. The surface of the tile must be primed and allowed to dry before spreading the adhesive (Category C2).
Tiling onto Existing Quarries, Glazed and Unglazed Tiles
Existing tiles must be sound, clean, grease-free and firmly adhered to the subfloor. Priming may be required and a Category C2 adhesive should be used. When tiling onto glazed tiles a polymer additive may be required. Consult Multichem for suitable products.
Products that you will need:
For further details contact:
Multichem Industries Pvt. Ltd.
Phone No: +91 9619091025
E-mail: info@multichemgroup.net
Web: www.multichemgroup.net